Displays a list of Users. Search, Export or Print the User List.
You can Add, Edit or Delete a User.
Edit a User: Click the Edit User icon to edit a User.
Delete a User: Select the checkbox to the left of the Name of the User, click the Delete button.
Permanently delete a User from Exepron. View the Delete a User section for additional information.
Use CAUTION! It may be preferable to designate a User as “Inactive” in Settings/User Details.
Adding New Users: Settings/Users
Click new (+) sign, to add New Users. The User Details wizard opens. Adding a New User Short Video

To add a New User to a given Portfolio – Add User Details:
Settings / User tab. All Users are added here.
Vendors and Sub-Contractors can be added as Users (with limited access by Permissions, Project Permission etc.).
Click New User Button [+].
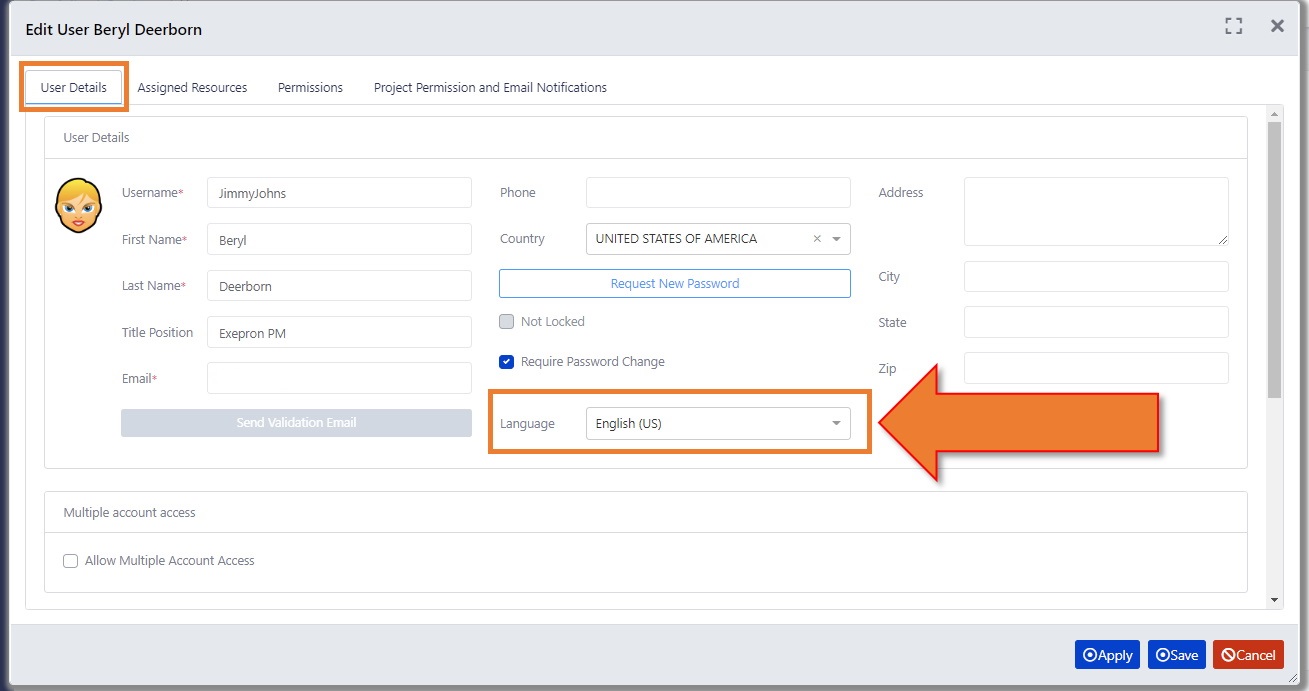
Add the User Details. Click Apply.
Click Permissions Tab. Add the User Role to designate the appropriate Permissions. Click Apply.
Click Project Access and Email Notifications Tab.
Click “Turn Off Project Access For New Project” – if this User is NOT permitted to see all newly created projects.
Selective Projects that this User is permitted to access. All Projects or a Selection of projects. Click Apply.
Click the User Details Tab. Click Save
Send Validation Email: All New Users will be required to Validate their Email and will receive a link to select a Password. Account Administrators will need to click the “Send Validation Email” button after adding a New User.
Password Security Requirements: minimum of 8 characters, a lower case character, an upper case character, a number, a “Special” character e.g. @#$%^&*()_+|~-=`{}[]:”;'<>/
Languages: Select the preferred Language by User from the Language dropdown menu.
Each Account can support multiple languages by selecting the language for a specific User to enable a User to view Exepron in their preferred language after login. Exepron Reports will be translated at a later stage.
Current translated Languages available include English, Hebrew, Japanese, Portuguese, Spanish, German, Ukranian, Japanese, and Chinese.
Additional languages will be available at a later stage.

General Details:
Status: Designate if User is Active or Inactive. An Inactive User will not be able to login to Exepron.
Receive Email Notification: Select this checkbox in order to activate the automated Email Notifications for this User. See Email Notifications here.
Is this User a Manager? Designate if this User is an Account Administrator, Project Manager, Resource Manager, Task Manager and Automated Task Update Manager (certain accounts only, upon request).
Designate the User as a Resource Type: Designate the User as a specific Resource Type in order to track Resource Type Work Hours and Costs in Task Details by Name e.g. Engineer (Bob Jones), Analyst, Engineer etc.
Vendors and Sub-Contractors may be designated as more than 1 Resource Type.
e.g. Vendor B can be designated as both a Bulldozer Supplier and a Crane Supplier.
New Accounts – No Resource Types are available to select in the Resource Type dropdown menu. Return to designate this User as a specific Resource Type after adding Resource Types in Settings.
Enterprise Executive Dashboard (EED): Select if this User has Permission to access additional Exepron Accounts within a Company. Exepron will activate the EED for specific accounts.
Show User Assignments: Click this tab to display a list of where this User is assigned as a Manager in Exepron.
Apply to navigate to the other tabs. Save to close and exit. Add additional Users at a later stage.


