CCPM: Critical Chain Project Management
CCPM is the preferred method for bringing a project in on Time, within Budget
and to Specification.
How: the early warning and proactive CCPM method provides timely and
appropriate warning signals long before a project runs into trouble. In addition,
Exepron will identify specifically which task(s) are jeopardizing achieving the
project Due Date.
Critical Chain: Exepron’s Advanced embedded Critical Chain intelligence
calculates the longest chain of Task and Resource dependency (the Critical
Chain), which includes resolving Resource contention.
The Critical Chain is considered to be the constraint of a project.
Task and Resource dependency: Exepron will calculate the longest
chain of Task and Resource dependency, which includes resolving
any Resource contention between Resources. This means you
cannot over-assign any of the Resources to a Task at any point in
time for this project. Consider this “built in Resource load leveling”.
Project Buffer: Schedule only the Touch Time for each Task.
Exepron automatically inserts a Project Buffer providing an effective
early warning mechanism on any task slippage; appropriate proactive
intervention is then timely and effectively focused on Tasks that are
delayed.
Feeding Buffers: Exepron automatically inserts appropriate
Feeding Buffers at integration points or convergence points with the
Critical Chain. Feeding Buffers protect the Critical Chain from
disruptions of non-critical chains path (feeding chains) task slippage.
Once again providing an effective early warning system on any Task
Slippage.
CCPM Schedule: Click the “CCPM Schedule” button to convert
the Project Plan (Project Network) into a feasible and executable
Schedule.

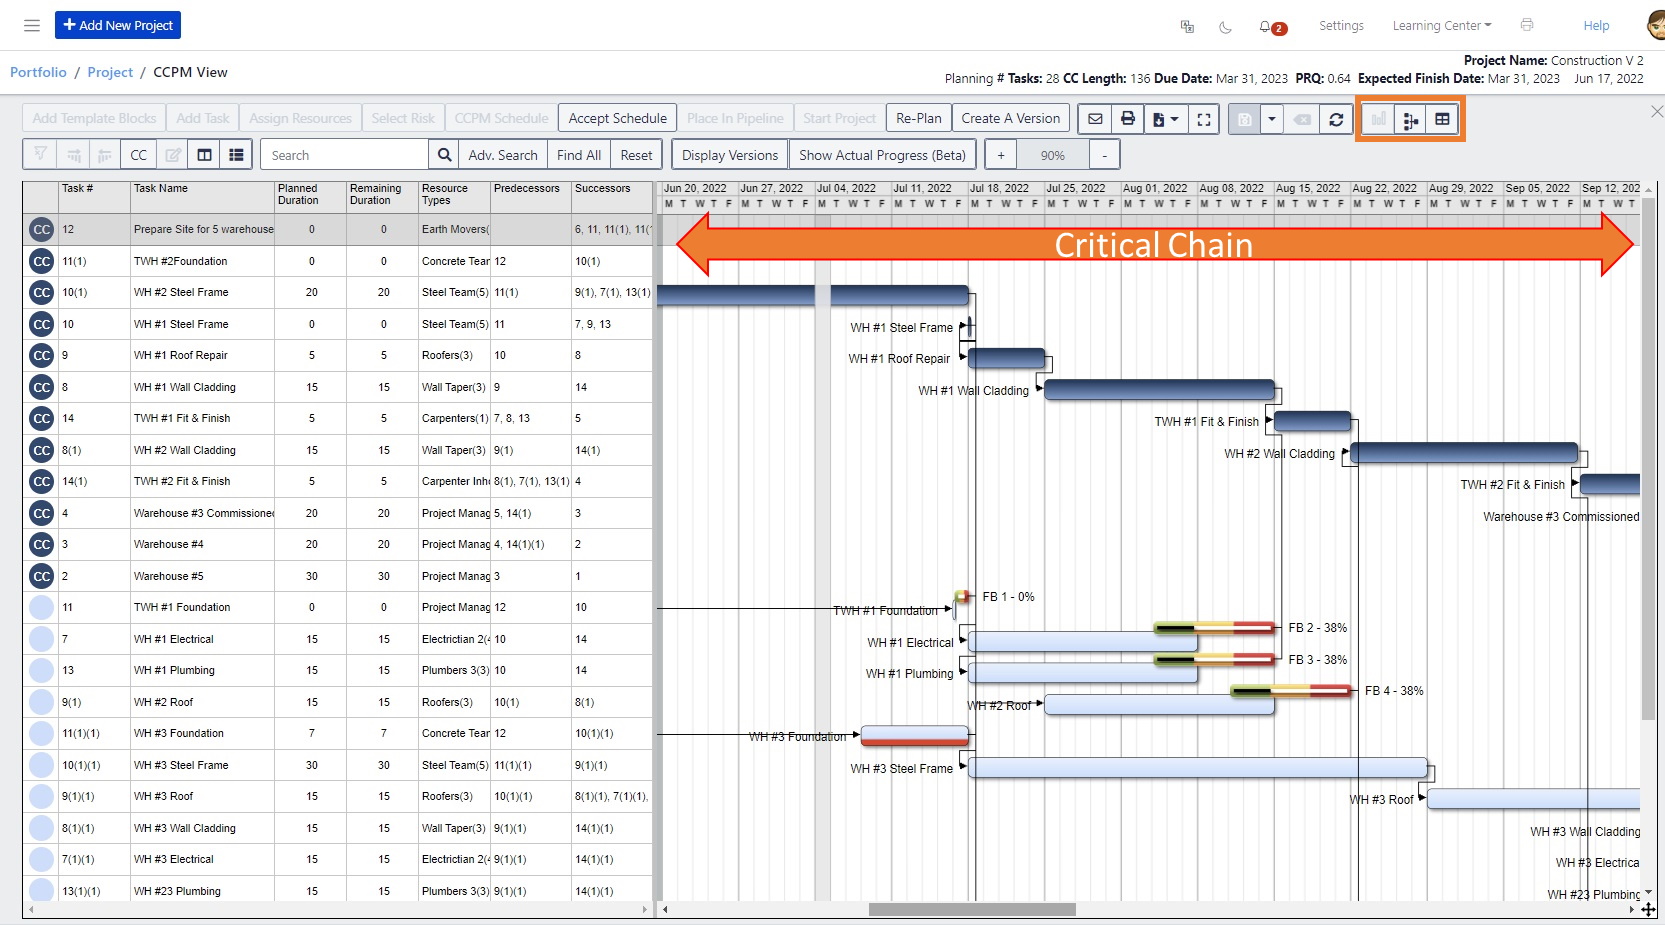
CCPM Schedule: The Critical Chain Schedule includes a Project Buffer and Feeding
Buffers (automatically inserted by Exepron) to protect against uncertainty and provides visibility on any
Task slippage.
It will pinpoint areas of concern and identify precisely what and where action must be taken. This will
become the Schedule that is used for executing the Project.
Exepron does NOT permit “gaps” in the Critical Chain. This may result in partially or fully penetrated
Feeding Buffers, depending on the Project Network. It may be necessary to modify by making changes to
the current project network.
Critical Chain Tasks are Dark Blue, Feeding Chain Tasks are Light Blue.

![]()
Re-Plan: Provides the opportunity to re-plan your Project. If the Critical Chain
schedule generated is not acceptable, it will be necessary to revert the schedule
back into a Project Network (click on the Re-Plan button), where assumptions
are challenged in order to improve the schedule. e.g. change dependencies, look
for opportunities to plan tasks in parallel rather than in series, change durations
or increase the number
of assigned resource types. Identify opportunities for turning sequential series of
Task dependencies into parallel Feeder Chains. All of these actions will have an
impact on the length of the Critical Chain and therefore on the overall project
duration. This process should be repeated until an acceptable schedule is
generated.
Use Caution: Only Re-plan a Started Project if there is a significant change to your
Project scope or Due Date.
An individual Project in progress may be affected by subsequent projects that are
already “Started”.
Project Due Date:
“As Soon As Possible” Project Due Date:
Select the “As Soon As Possible” checkbox as the due date for this project. Exepron will
schedule the project with today as the project Start Date.
Aggressive Project Due Date: In certain environments, a schedule with an earlier or
more aggressive Project Due Date may be required. This will result in a partially
penetrated Project Buffer which will increase the scheduling and execution risk for this
project, as reflected by the Project Risk Quotient.
Scheduling an Aggressive Project Due Date:
Select the “As Soon As Possible” checkbox for the Project Due Date.
Click the CCPM Schedule button to schedule the project.
View and note the Project Due Date displayed by Exepron.
Click the “Re-Plan” button to revert the project back into Planning.
Change the Project Due Date to an earlier project Due Date and reschedule the project.
Repeat this process until a project schedule with an acceptable risk is achieved within
the scheduled Due Date.
Note: Scheduling a project with an aggressive Project Due Date with a partially
penetrated Project Buffer, will increase the execution risk for this project.
![]()
Accept Schedule: When a Project Network is turned into a Critical Chain schedule
and meets the team’s requirements, it must be Accepted and is automatically saved.
Click Accept Schedule to accept the Critical Chain schedule for this project.
The status of the project is referred to as an “Accepted” Project in the Portfolio of
Projects.
![]()
Place in Pipeline: Click Place in Pipeline to place your Accepted project in Pipeline.
Run the Dynamic Drum to find a Recommended Start Date for a specific project.
View the Dynamic Drum section for additional information.
Since Exepron is a Multi-Project solution it will look for the best date to start a project,
recognizing the limitations of sharing resources across all of the projects in the Portfolio
of Projects.
The status of a Project in the Pipeline remains inactive until the Project Manager
Activates/Starts the Project.
Once a Project is Started, it is now in Execution.

Save Copy As: Save a Copy of the current project. You will need to enter a new Name
for this project.
A copy of a Started Project will display as a Frozen Project in My Dashboard.
Save As Template: Save this Project as a Template will make a copy of the project
with the original “Planned”
and “Accepted” Task durations before the project “Started”, and not the current status of
the project in Execution.
Select the information to Save with this Template.
All Templates can be viewed in the Templates and Template Blocks Library

Click the Close Table icon to close the Left Table. Click the Open Table icon to open
the left Table.
Click the PERT View icon to view the PERT after the project has Started.


