Portfolio Dashboard: The Portfolio Dashboard is designed to provide a quick overview and displays the status of all Projects in a Portfolio.
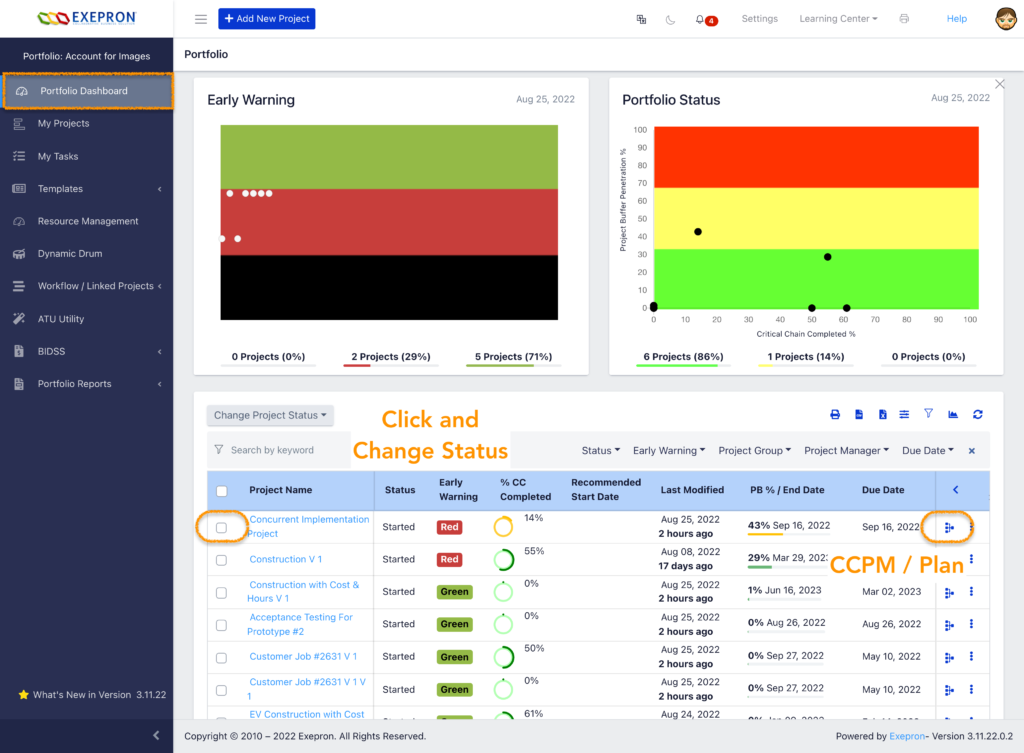
Early Warning Chart: Displays the last (current) data point in the trend of each
individual Started Project.
⦁ GREEN The Project Due Date is achievable as planned.
⦁ RED The Project Due Date is in jeopardy – analyze and take action.
⦁ BLACK The Project Due Date will not be achieved without immediate
intervention.
Portfolio Status Chart: Displays the actual progress of execution of the Critical Chain
vs. the penetration of the Project Buffer:
⦁ RED means Immediate Attention is required,
⦁ YELLOW means Caution,
⦁ GREEN means tracking as Planned.
Hovering over a dot on the Portfolio Status chart will highlight and identify the status of a
specific project on the Early Warning Chart.
Hovering over a dot on the Early Warning chart will highlight and identify the status of a
specific project on the Portfolio Status chart.
Portfolio Dashboard Table: Displays the status of all Projects in a
Portfolio.
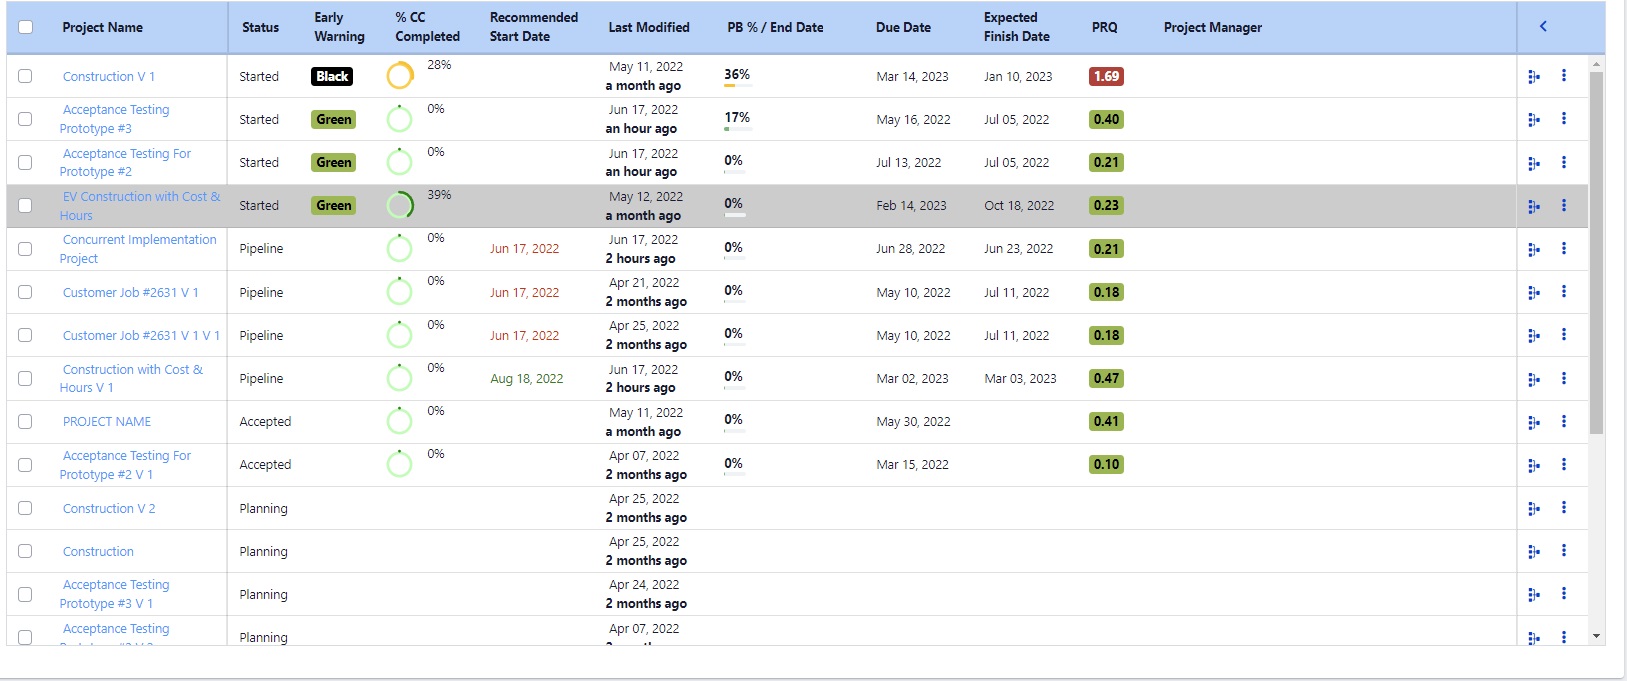
Change the Status of a Project: Select the checkbox to the left of the project name, click the Change Project Status button in the gray toolbar, select the status, click ok to
change the status of the project.
Project Name: Click the Project Name to navigate to the Individual Project Dashboard of the specific project.
Plan / Schedule: Click the Plan/Schedule icon to navigate to the selected Project Plan
if the Project is still in the planning phase, or navigate to the selected Critical Chain Project
Schedule if the Project has already been Accepted, is in the Pipeline, or Started.
View / Update Task: This is where a User can update a Task to reflect the
current Remaining Days of a given Task.
![]() View / Update Tasks: Clicking the icon to view the View/Update Task
View / Update Tasks: Clicking the icon to view the View/Update Task
Table for a specific project.
Each Task can be updated to reflect the current Remaining Days status. That is,
CCPM only tracks the Remaining Days required to complete a given Task. The
User can update just one or more than one Task’s Remaining days.
Note: Enter zero Remaining Days when the Task is completed. Multiple tasks
can be updated at once.
Click the Edit Task icon to open the Task Details for each Task.

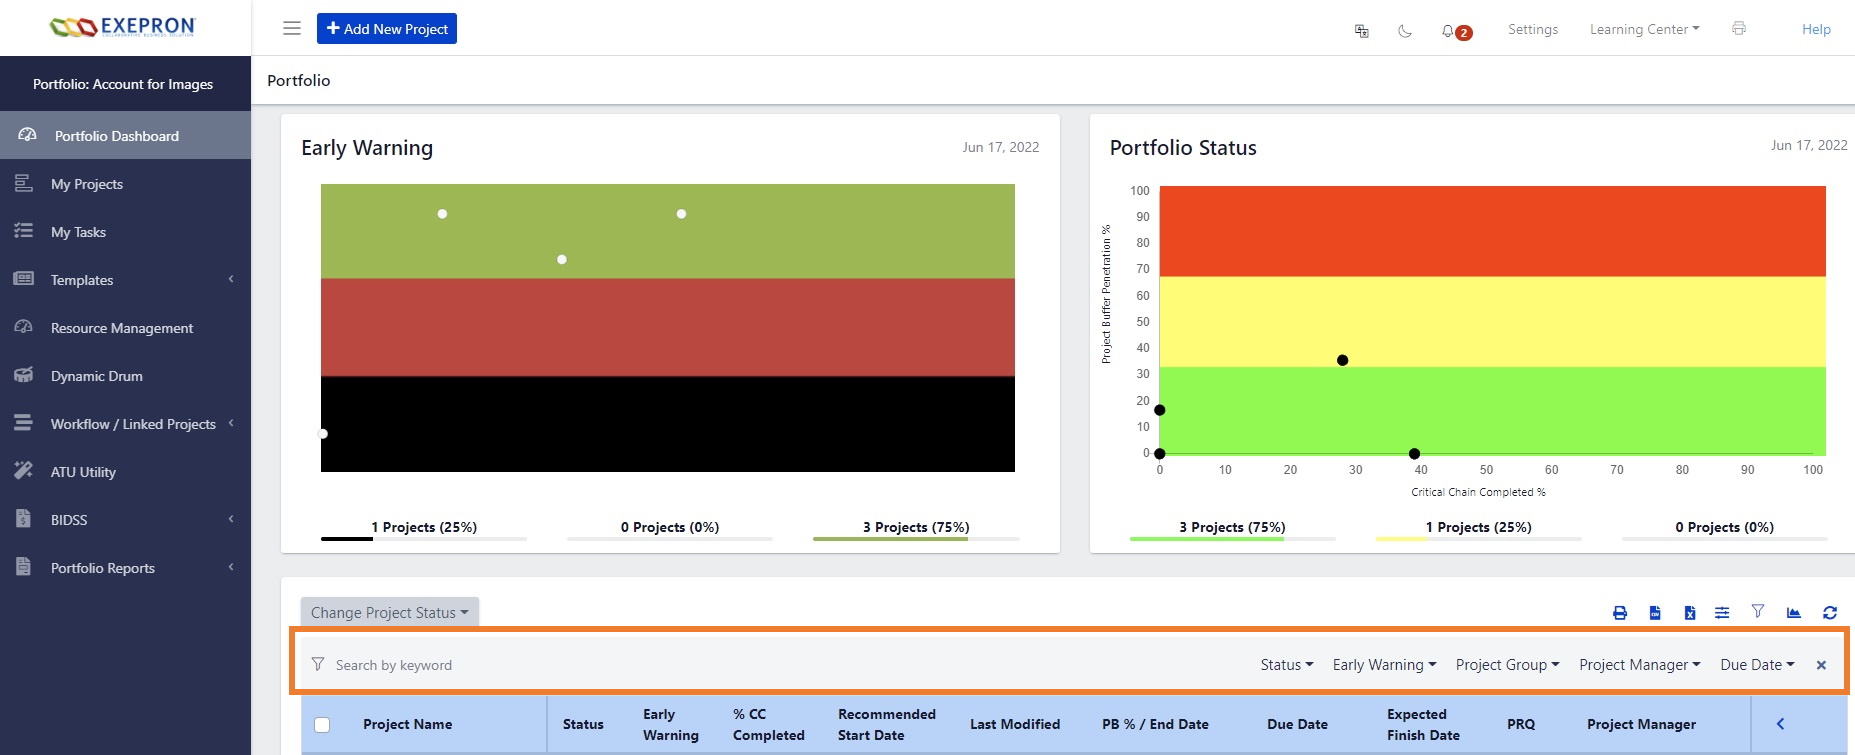
Search for a particular Project by name or portion of a Project name.

Change Project Status: Change the status of a Project to: Accept, Pipeline, Start,
Freeze, Archive or Delete.

Dynamic Drum: The Dynamic Drum synchronizes the release of all Projects in
the “Pipeline”.
The Dynamic Drum displays only active “Started” projects and Projects in
“Pipeline” at their Planned Start dates.
The Dynamic Drum is focused on maximizing the throughput for the entire
Portfolio of Projects in the organization.
IMPORTANT: In Exepron® the Dynamic Drum is forward looking and is based on
maximizing throughput.
It is NOT based on historic or past use of a particular resource or the most heavily
loaded resource.
Therefore the Dynamic Drum and the Drum Resource changes as projects are
introduced into the “Pipeline”.
Exepron’s Dynamic Drum will select a Resource common to most projects in the
portfolio of active “”Started” projects and projects waiting in “Pipeline”. This Drum
Resource will be used across most projects and for extended periods of time, and may
or may not be the most heavily utilized resource.
Purpose: The primary purpose of the Dynamic Drum is to calculate, prioritize and
stagger the Start Dates for ALL of the projects that are waiting in the “Pipeline” for a
start date. This in effect will “pull” a project into the workflow at the right time resulting in
maintaining the correct amount of work in process across the entire Portfolio of Projects,
which is the key to maximizing throughput.
“Started” (Active) projects are not affected when running the Dynamic Drum.
After a CCPM schedule has been “Accepted” (Accept Schedule) and the user is ready
to get a Recommended Start Date for a project, select Place in Pipeline in the CCPM
Schedule screen or change the status of the project to Pipeline in Portfolio Dashboard.
Projects in the Pipeline are ready to be assigned a recommended Start Date in the
Dynamic Drum.
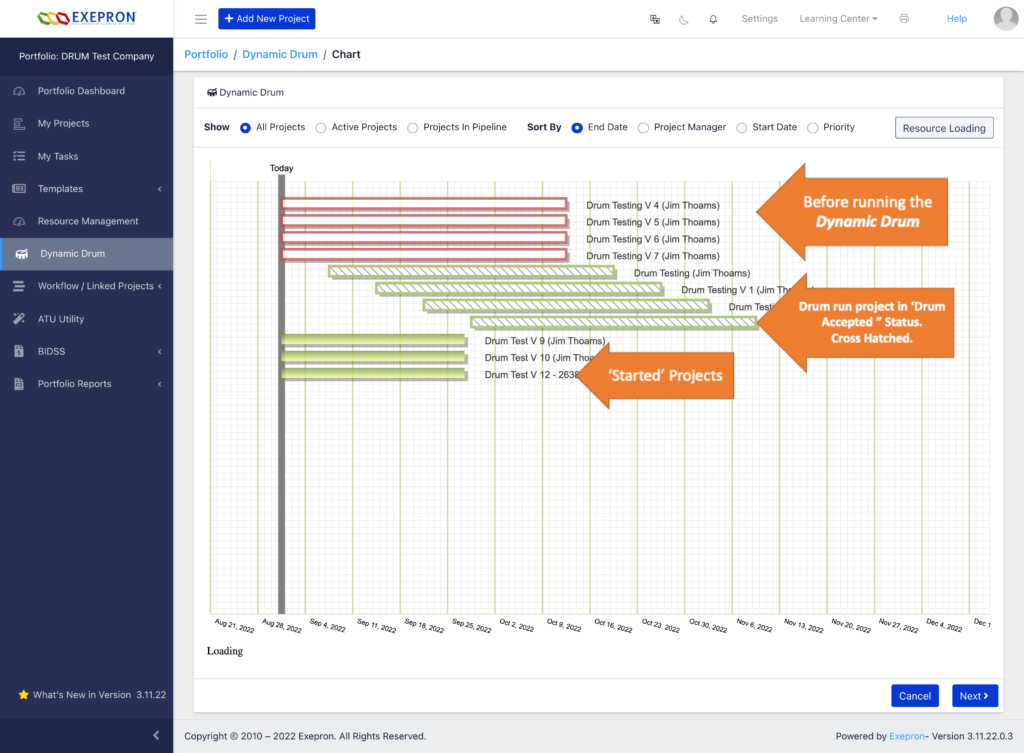
Step 1: The Dynamic Drum displays current “Started” projects and projects in
“Pipeline”.
“Started” projects are displayed as solid horizontal bars and are fixed in time.
The green, yellow and red colors correspond to the Project Buffer penetration. The length
of the horizontal bars correspond to the Planned Start and Planned Finish dates of each project. Hovering
over the horizontal bar will display the tooltip with project information.
“Pipeline” projects are displayed as transparent horizontal bars and have not completed an “Accepted”
Drum run.
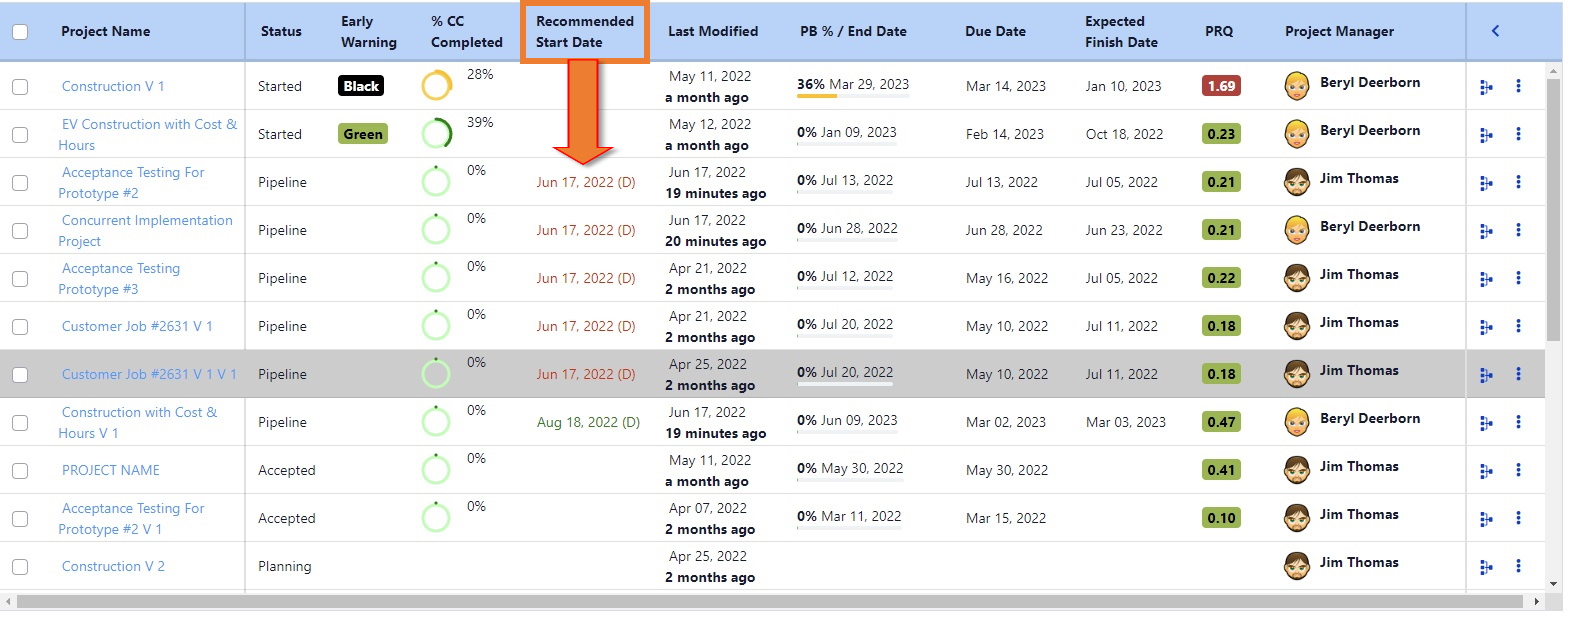
“Pipeline – Drum Accepted” projects have completed an “Accepted” Drum run and display as transparent
horizontal bars with a “cross hatch” pattern. “Pipeline – Drum Accepted” projects display with a (D) in the
Recommended Start Date column in Portfolio Dashboard/Portfolio Dashboard Table.
Pipeline Projects display above the “Started” projects at the top part of the screen.
“Pipeline” Projects are displayed on the calendar at their Planned Start dates.
“Pipeline-Drum Accepted” Projects are displayed on the calendar at their new Drum Recommended Start
dates.
Click the “Next” button located in the lower right-hand corner.
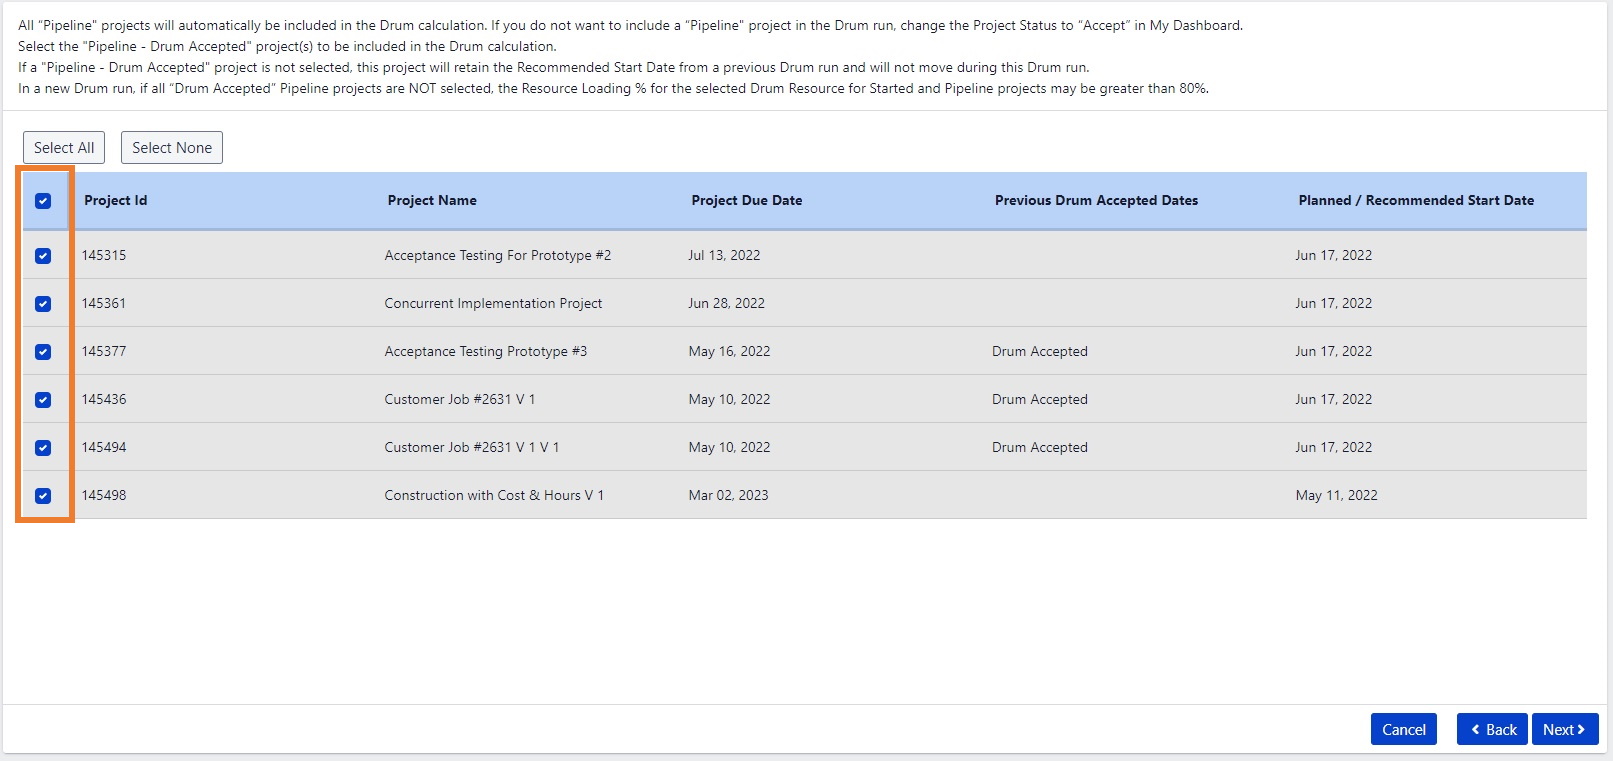
Step 2: Select the Pipeline Projects you would like to include in this Drum
calculation.
Select the checkbox to the left of the Project Id to include a project in the Drum run to
receive a Recommended Start Date for this project. Pipeline Projects that display “Drum
Accepted” have already received a Recommended Start Date when the “Accept” button
was selected in a previous Drum run.
If you would like to include a “Drum Accepted” Pipeline Project in this Drum run to
receive a NEW Recommended Start Date, select the checkbox to the left of the Project
Id.
Click the “Next” button located in the lower right-hand corner.
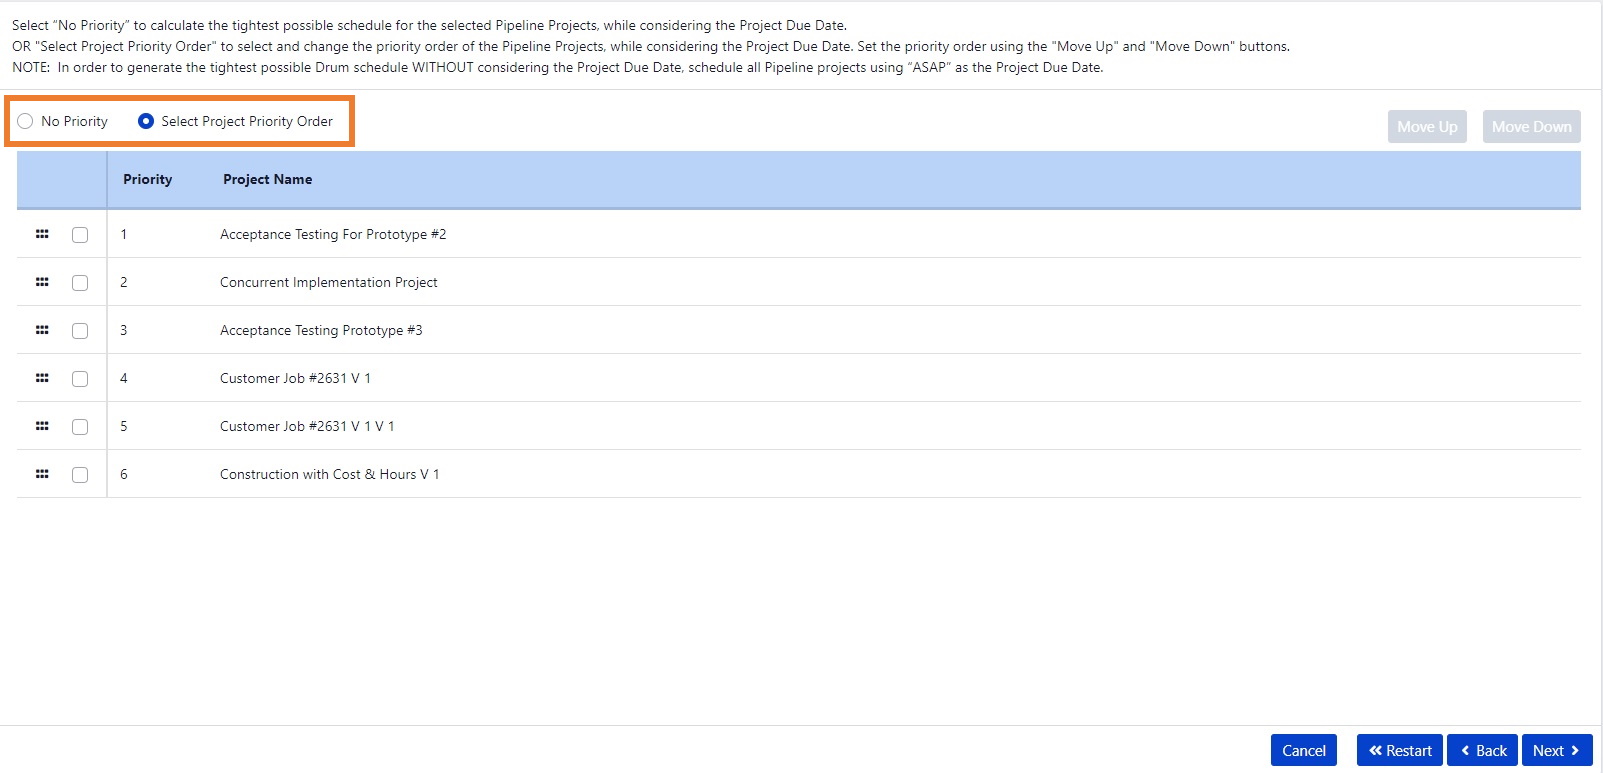
Step 3: Select “No Priority” or Select the “Project Priority” Order
No Priority: Select “No Priority” to calculate the tightest possible schedule for the
selected Pipeline projects, while considering the project Due Date.
Tightest possible Schedule: In order to generate the tightest possible Drum schedule
WITHOUT considering the Project Due Dates, schedule all projects using “ASAP” (As
Soon As Possible) as the Project Due Date.
OR
Select Project Priority Order: “Select Project Priority Order” to change the priority
order of the Pipeline projects, while considering the Project Due Date. Exepron will
calculate the Recommended Start Date according to the priority order, while considering
the project Due Date.
A project can be given a higher priority start date by using the ‘Move Up’ or ‘Move
Down’ buttons.
This should only be used selectively such as with a higher risk project, tactical or
strategic high value projects etc.
Click the “Next” button located in the lower right-hand corner.
A Green check mark will indicate the Exepron recommended resource (Drum
Resource) that will be used to determine the Start Dates for the selected “Pipeline”
projects.
The Exepron recommended Dynamic Drum Resource is a Resource common to most
projects in the portfolio of active “Started” projects and projects waiting in “Pipeline”.
This Drum Resource will be used across most projects and for extended periods.
This Drum Resource may or may not be the most heavily utilized resource.
Alternatives are:
Select the recommended Drum Resource by clicking on the name (the name will be
highlighted).
OR
Select an alternative Drum Resource from the list.
OR
A Virtual Drum may be selected to synchronize and stagger Pipeline projects.
Review the Settings/Resource Types section in the Exepron Reference Guide.
Common reasons to override the Exepron selection might include: physical space
limitations, natural points of operational convergence, integration points, or
tactical/strategic business considerations.
Select the Drum Resource by clicking on the Resource Type name (the name will be
highlighted in gray).

Click the ‘Next’ button to continue.
Step 5: Accept the Recommended Start Dates for the Pipeline Projects.
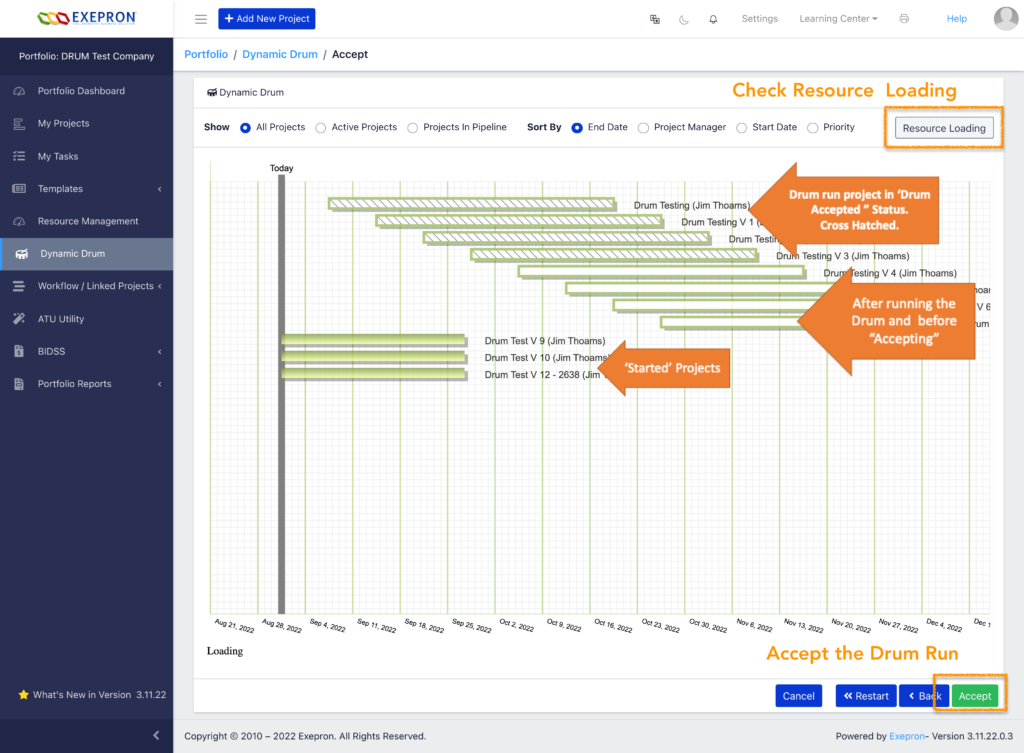
Resource Loading: Click the Resource Loading button to display the Resource Loading for Started and
Pipeline projects as displayed on the calendar on this Drum screen.
Drum Accepted Pipeline projects that were “Accepted” in a previous Drum run will
display with a “cross hatch” pattern in the horizontal bar in the Drum screen.
Pipeline projects that have not been “Accepted in a previous Drum run will display as a
transparent horizontal bar.
Accept: click the ‘Accept’ button to continue only when you are absolutely certain you
wish to Accept the Drum Recommended Start Dates for these projects.
Click “Ok” to Accept the Recommended Start Dates.
Back: click Back to change your selection.
If the Recommended Start Dates displayed are not acceptable, click the “Back” button
to select a new Drum Resource or to return to a previous screen.
Cancel: click Cancel to cancel and exit the Drum.
Drum Accepted Pipeline projects will display with a “cross hatch” pattern in the Drum
screen and will display a (D) in the Recommended Start Date column in My
Dashboard/Portfolio Dashboard Table.
Remove “Drum Accepted” Recommended Start Date: If you would like to remove a
“Drum Accepted” Recommended Start Date from a Pipeline Project and return the
project to the “Planned Start Date”, re-select the “Pipeline” status for the project in My
Dashboard.
Select the checkbox to the left of the Project Name in Portfolio Dashboard, click on the
“Change Project Status” button and re-select “Pipeline” status. The project will return to
“Pipeline” status.
Start a Project: The User then manually “Starts” the “Pipeline” project in My
Dashboard according to the individually Recommended Start Dates for a project.
Click the Play button next to the project name to Start the Project OR Select the
checkbox to the left of the Project Name, click the “Change Project Status” button on the
gray toolbar, select Start.
However, the User may choose to override the Recommended Start Date and start a
project at any time.
Warning: When choosing to override the Recommended Start Date, this action has the
potential to negatively impact the other projects that have already “Started” and the
projects in “Pipeline”.
Click the Project Dashboard / Resource Management” button to navigate to the
⦁ Weekly Resource Loading % Chart (Bar Graph)
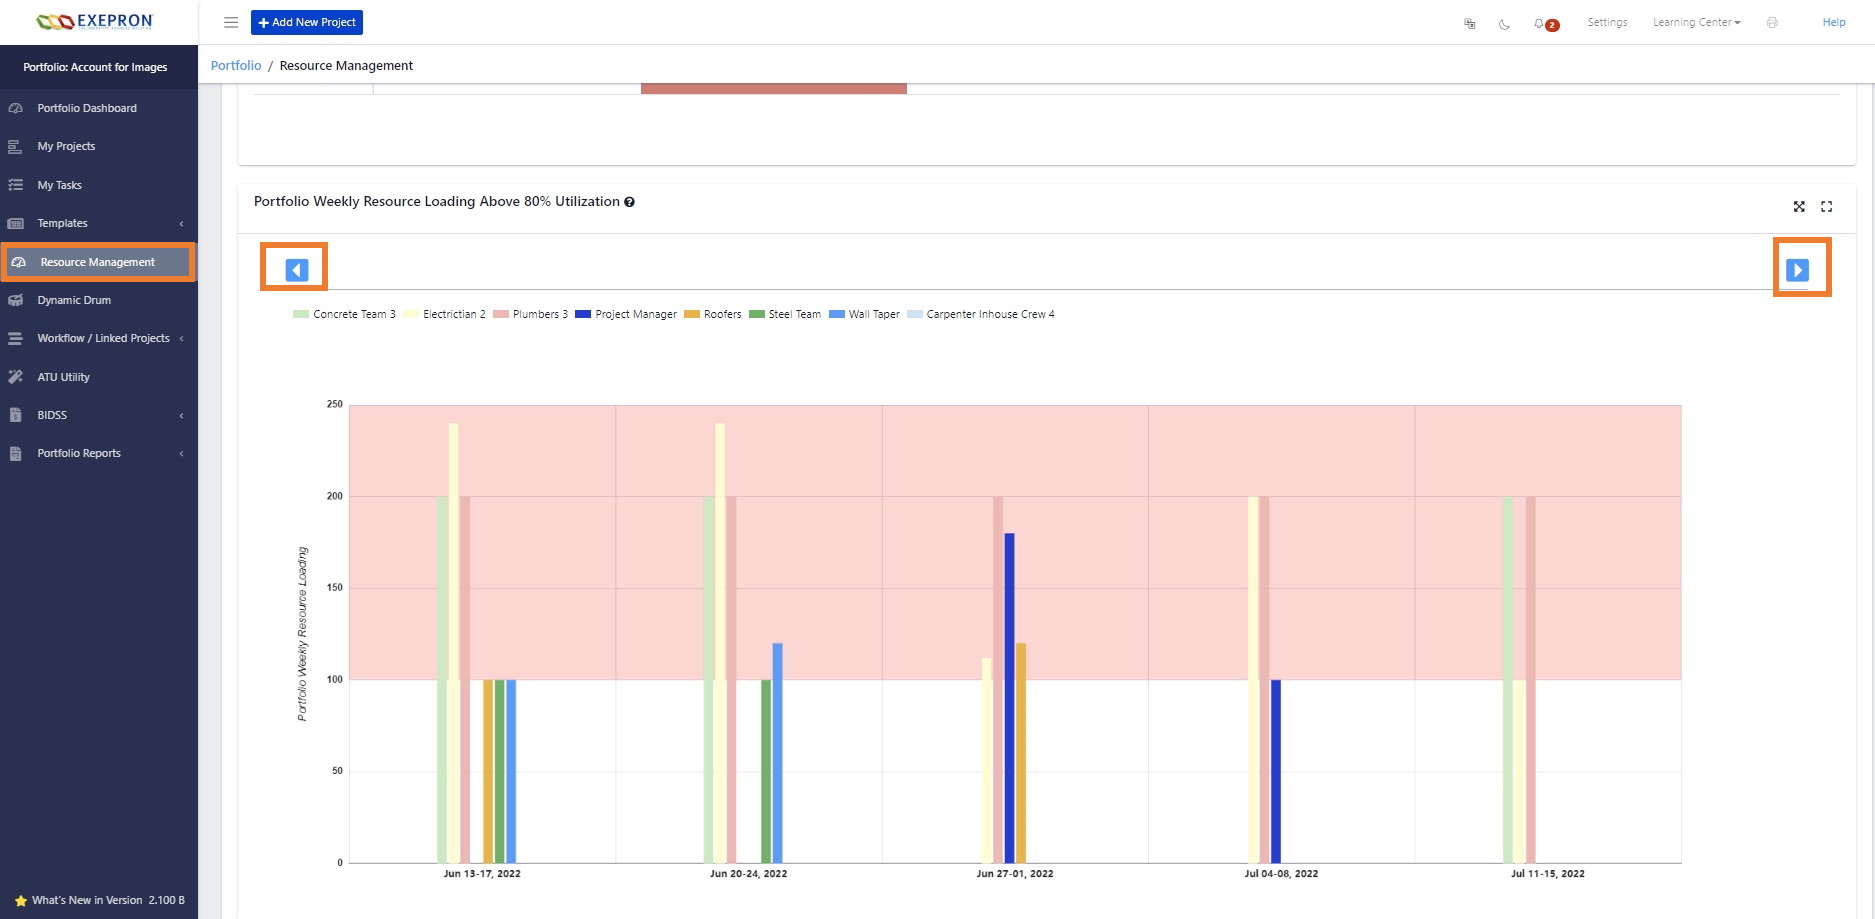
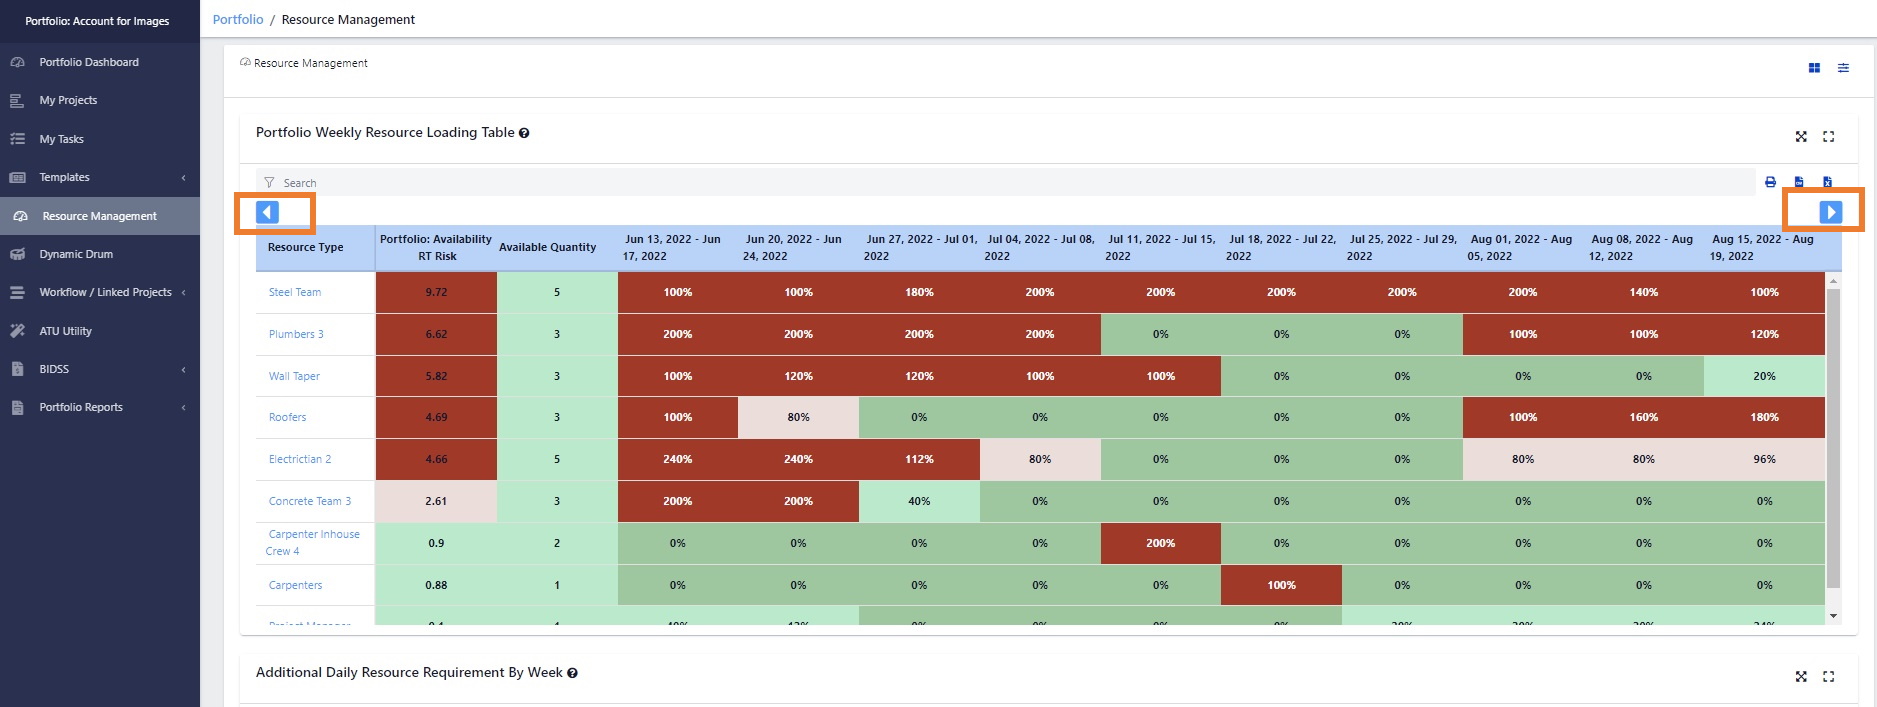

Click Reports to view the Resource Manager Report and Task Manager Report. Click
the Report Headers to sort and customize the report e.g. click ‘Resource Type to
generate this report.
Export the Resource Manager Report in different formats.
Click to view the Task Managers Report. Select a single Task Manager or multiple
Task Managers.
Click on the Headers to sort and customize the report. Export the Task Managers
Report in different formats.
Click Reports to view the: Daily Resource Quantity Loading Report, Project
Portfolio Report; Resource Loading Table Chart; Account Resource Type
Work Hours Report (by Permission only); Account Cost Summary Report (by
Permission only), Account Revenue Report, User Activity Report.


